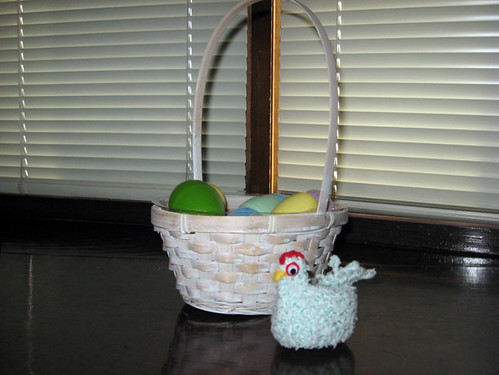
Need a last minute Easter gift or decoration? Try one of these chicken egg cozies. They take just about an hour from start to finish, and they work really well in using up spare bits of yarn and felt around the home.
Years ago, my mother had purchased some chicken plastic egg cozies, and each person in my family had one that we used to decorate for Easter. Over time, they all became lost. I started a family of my own, and, as silly as it sounds, I wanted to have some chicken egg cozies for each of us in my new family. Initially, I thought the chickens were crocheted. I looked online for patterns, both knit and crocheted, but nothing was really like the ones my mom had. My mom did eventually find one of the original chickens for me, and, to my pleasant surprise, they were knit (at that time, I didn’t crochet). This pattern was written based on one of those original chickens. I've had the pattern figured out for a couple of years now, but just got around to putting it up. I'm kind of lazy that way.
Chicken Egg Cozy pattern
Needles: US size 4, 5, or 6 (3.5, 3.75, or 4 mm) or size needed to obtain gauge. Finished knitted piece is
about 5.5 inches long, so you need to get to roughly 5.5 stitches/inch. Keep in mind, many plastic eggs are about 6.5 inches around from the tip of the egg to the bottom and back, and you want to have the piece stretch out to fit firmly around the egg.
Yarn: About 13-15 yards of any worsted weight or sport weight yarn. Red Heart Baby Teri was used for the one pictured. I also used Bernat Baby Coordinates. Gauge is essential! If you don’t meet your gauge, the chicken may be too tight or too loose to fit around the egg. For the Baby Teri, I used size 4 needles, but the Bernat Baby Coordinates I had to go with a 6, and might even recommend a 7.
Googly eyes, 7mm.
Small bits of red and yellow felt.
Sewing thread to either match felt colors or chicken color.
Instructions:
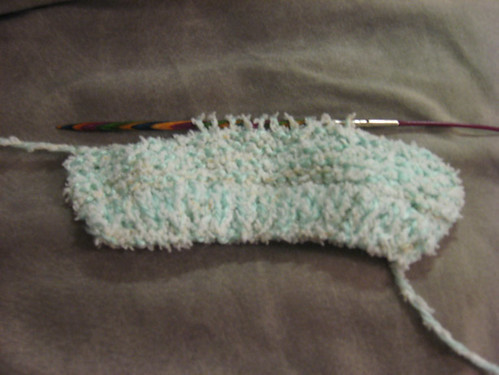
Cast on 30 stitches. Leave long tail for seaming.
K1, P1, repeat to end. Work three more rows of 1x1 ribbing.
Rows 5-12: Knit.
Bind off 10 stitches, knit 9 more (10 total on needle right now), bind off last 10. Break yarn. There should be 10 stitches left in the middle of the piece as shown below.
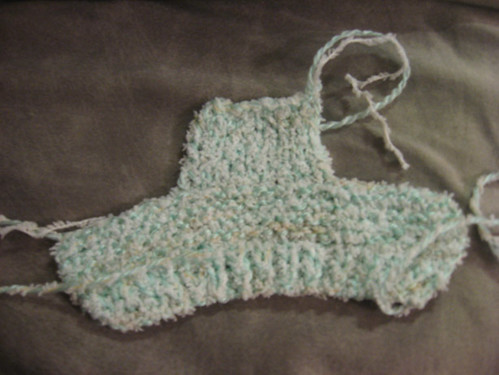
Join in yarn to the live 10 stitches left on needle, leaving a long tail for seaming. Purl the first row.
Row 2, 4, and 6: K
Rows 3 and 5: Purl.
Bind off in purl. It will look like this:
To finish:
Fold knitted piece in half vertically down the center stockinette piece, creating the head and body. It should look like this:
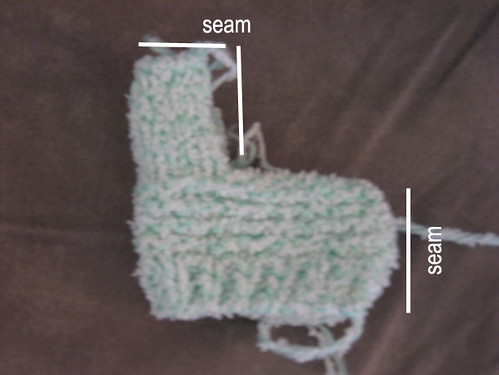
Weave in ends not used for seaming. Seam up top and back of head. Seam up back of chicken. DO NOT SEAM TOP OR BOTTOM OF CHICKEN BODY.
To create tail, thread yarn at top of back seam of chicken from inside out. Wrap yarn around a couple of fingers, and thread back into back of chicken. Repeat this 7 times or until you get a tail as full as you want. Tie off.
Using red felt, cut two small circles slightly larger than googly eyes. Glue felt to sides of head, then glue eyes on top of felt circles. To create comb, cut a piece that will fit the top of the head with three or four bumps at the top. Sew to top of head.
Using yellow felt, cut a small triangle. It might work well to just cut off the corner of a square piece of felt. Sew beak on with the tip of the triangle facing down, sewing only at the base of the beak.
Insert a standard size plastic egg into the bottom of the chicken with tip of egg in the front.

posted by Arwyn Y. @ 12:53 PM
![]()

3 Comments:
Hello. This post is likeable, and your blog is very interesting, congratulations :-). I will add in my blogroll =). If possible gives a last there on my blog, it is about the Wireless, I hope you enjoy. The address is http://wireless-brasil.blogspot.com. A hug.
Oh I love this chicken! Will put this on my to do list for this next year. Thank you for sharing it. ~Tricia
What dear little chicks - I shall certainly be making them next year for the grandchildren. Thank you for sharing the pattern.
Post a Comment
Subscribe to Post Comments [Atom]
<< Home